
Testing a Honda Distributor can be done a couple of ways, with some ways being more complicated than others. In this article, I’m going to walk you through the basic tried and tested methods of testing every component of a Honda distributor.
- Ensure each plug lead has spark.
- Remove distributor cap/rotor arm and inspect for signs of cracking, oil or damage.
- Check the terminals on the ignition coil for corrosion.
- Measure the ohm resistance of the primary/secondary windings of the ignition coil using a multimeter.
- Check the correct voltage is powering the igniter.
If this sounds like a job you’d be confident carrying out yourself, continue reading for a more in depth look at how to test a Honda distributor. This article covers everything you need to know about diagnosing and replacing worn parts in your Honda distributor, which results in big savings compared to buying a new distributor.
How To Test For No Spark
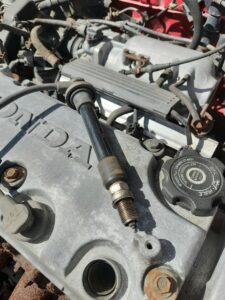
To test a Honda distributor start by removing one spark plug and plug lead from the engine. Once they’re out, stick the spark plug or an ignition tester into the end of the plug lead like shown in the image, leave it down on a grounded/earthed point of the car and crank the engine.
If no spark jumps between the spark plug and earth, it would indicate the distributor is faulty or a component inside the distributor is faulty.
Repeat this process on the other three plug leads. If there is a spark jumping but only from some leads and not them all, this would point to a bad plug lead breaking down under load causing a misfire.
This is especially a problem in the rain. When plug leads begin to break down the rubber insulation can become damaged or cracked, when it rains or you wash the engine bay the insulation lets in water causing a bad misfire in the engine or the engine just won’t fire up at all.
Luckily plug leads are an cheap easy fix. You can buy a set of plug leads from any auto parts store for about $40, but if that doesn’t solve your problem the next step is to remove the distributor cap and take a look inside.
Removing The Distributor Cap and Rotor Arm
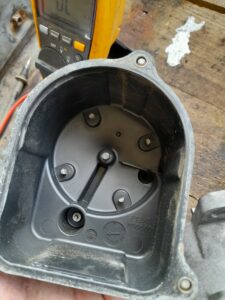
This is where the fun starts so begin by opening the three 8mm bolts holding the cap in place. Once there lose the cap should come off pretty easy. When you have the cap off look inside and inspect for any signs of oil, cracks, or corrosion on the electrode contact tips.
Cracking is a common problem with distributors due to the heat from the engine. This can play havoc with a car’s ignition system, especially in the rain because the water can get inside the distributor causing a bad misfire or the car completely stalling.
Cracks can be hard to spot, but a pro tip is to start the car at night in the dark (if it will start that is) and if the cap is cracked you’ll see the spark jumping around the cap.
Once your happy with the cap you can remove the rotor arm by opening the Philips screw at the back of the arm. This screw could be facing the ground depending on the position of the cam, to rotate the screw to the right position just crank the engine a little and the shaft will turn to face you. This screw can be tight so be careful not to damage the head of the screw.
Testing a Honda Ignition Coil
First thing to do is check the terminals of the ignition coil for rust or corrosion, this is a common problem and can be easily fixed if that’s the only problem. If there’s no visible corrosion go ahead and disconnect both wires from terminals marked (a)+ (b)-.
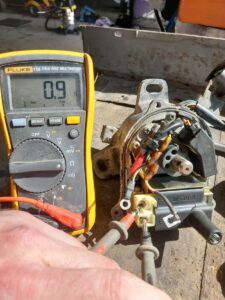
Now with your multimeter set to ohms, connect the red lead into the (a)+ terminal and the black lead into the terminal marked (b)-. This will tell you the resistance of the primary winding of the coil which should be between 0.8-0.9 ohms depending on the temperature of the coil.
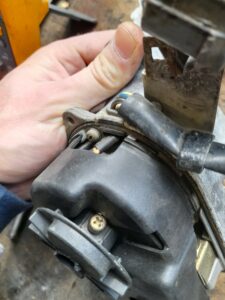
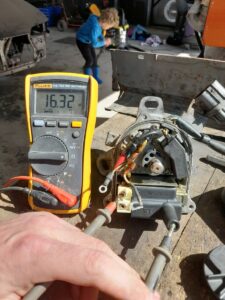
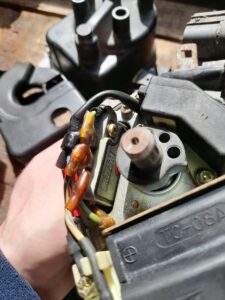
Now you need to check the resistance of the secondary winding by connecting one lead of your multimeter into the (a)+ terminal and the black lead onto the spring sticking out the front of the coil the same as the photo.
This spring is the connection that allows the voltage to travel from the coil into the cap. This should give you a reading of about 16 k-ohms.
While all coils will vary slightly depending on the manufacturer, they will all be reasonably close to these figures, so if you get a reading that is completely different you need to replace the ignition coil.
A new ignition coil will cost you $50 in any auto parts store and you remove it by opening the two screws in the bottom of the coil.
But if you still have no spark and the ignition coil is giving you a good reading the next thing to look at is the igniter unit.
How to Test The Igniter In a Honda Distributor
- First disconnect all four wires that are connected to the igniter.
- With your multimeter set to DC and the ignition switched on check for voltage between the Black/Yellow wire and ground, there should be 12v.
- With the ignition switched on check for voltage between the white/blue wire and ground, there should be 12v.
- Check for voltage between the yellow/green and ground and the blue wire and ground, there should also be 12v.
- If all test show up a reading of 12volts this means the igniter is faulty and needs to be replaced.
How a Distributor Works
A distributors main function is to create massive amounts of energy which then flows in a synchronized and timed pulse through the plug leads and into the spark plugs, creating a spark which ignites the fuel in the cylinders in perfect timing.


A distributor can be broken down into four main parts. The cap the rotor arm the ignition coil and the igniter.
The igniter is energized by a 12v supply when you switch on the ignition, that 12v then pass through a primary and secondary set of windings in the ignition coil transforming 12v to 22,000 volts.
22,000 volts is then passed from the ignition coil through the spring terminal on the coil (shown in the image) into the cap. From there the voltage is distributed out to each plug lead via the rotor arm spinning and making electrical contact (slight air gap) with the four contact tips inside the distributor cap. Which lets the power flow from the distributor to the spark plugs.
Recent Posts
As much as I and everyone else love turbochargers there is one problem most people have with using them, turbo lag. Turbo lag is a hesitation or unresponsiveness which may be felt as a slow...
Last week a friend of mine arrived in my shop with a Garrett 3076R turbocharger and asked me if I could install it in a stock Miata MX5 because he wanted to more power out of corners on the track....